It's been more than a year since I purchased a set of Ortlieb panniers for the Vespa and high time to report on what followed. When I bought the scooter I was unable to find saddlebags specifically made for it so I began searching in other areas. I soon discovered there are a lot of panniers made for bicycles including Ortlieb's waterproof Back-Roller Classics.
They're available in several colors and their red is a great match for my Vespa; all I had to do was come up with a way to mount them.
I might mention that Ortlieb also makes a set of throw-over bags designed for motorcycles but using them on the Vespa would be awkward; the scooter's gas filler is located underneath the saddle so each time you filled up you'd need to remove the bags. At best that would be clumsy, not what I was looking for.
Deciding to go ahead I placed my order on line and they soon arrived. It was immediately clear their quality was very good which is probably why you see so many of them on the road.
My initial mounting rack design reflected ideas as used for traditional motorcycle saddle bags. They're generally a lot heavier than the Ortliebs I'd be using but it was a starting place. I like to use PVC tubing for building mock-ups, it's easy to work with and cheaper than metal.
 |
| My 1st design effort wasn't so good. In fact it was pretty awful... Back to the drawing board. |
 |
| This is my drawing board...It couldn't get much sillier than this. |
Realizing my efforts weren't going all that well I continued to search the Internet for more design ideas. Before long I developed a somewhat jaundiced attitude towards my fellow man, particularly those with engineering skills. I began to dress accordingly.
 |
| Words to live by.... |
I even ran across what would seem to be the ultimate urban scooter. Imagine weaving in and out of snarled traffic on this puppy. Who would challenge you? Billy-Bob? I think not.
 |
| Can you say Anarchy? Coming through...step aside please... |
I wrote to the builder of the following scooter located in South Africa asking if he would consider fabricating a setup like his but he never answered. I imagine his mail box was flooded with similar requests and he probably lit out for the bush. After studying his design I think it would be easy enough to make one just like it at home.
 |
| Would this be hard to take? |
 |
Those look like Pelican panniers. Not sure about the latches, they might be something he sourced from the boating industry
|
 |
| For the brackets he used all stainless steel, the best there is. |
Then I asked myself when was the last time you really wanted to ride out in the sticker-bushes and that led me back on the path to the KISS approach. Still I like his scooter a lot so maybe one day...
 |
| First version of my KISS design mounts using PVC - it worked. |
Having ridden a few thousand miles using the simple mounting system I wanted a final copy made of aluminum, maybe with a better means of attaching it to the scooter. For that I enlisted the skills of Ron at Bandon Fabrication, he's the guy responsible for some of the best work I've had done in the past on other bikes.
Even though it's his busy season he managed to find time to turn out the main mounts but coming up with a final means of attaching them to the scooter was going to require more time than he could spare. I decided to see if I could clean up the system I'd used on the PVC version and went ahead with that.
 |
| Before starting I covered the unused back guide with a rubber strip made from an inner tube, then added a felt pad to prevent the scooter's fender from contacting the bag. If I'd done that before my ride to Canada I would have avoided a few scratches on the paint. Duh... |
 |
| This is Ron's aluminum mount ready for finishing. First order of business was to mount the bar in place using the hose clamps from my PVC version. I used soft plastic tubing underneath the hose clamps to protect the chrome rail. |
 |
| I picked up a couple of red reflectors on EBay to mount on the bar ends. |
 |
| Mounting the reflectors required drilling and tapping a 6 mm hole. |
 |
I used cutting oil to help make the tapping process easier. It doesn't smell as nice as Hoppe's gun oil though. The reflectors are nearly a perfect match for the round stock.
|
 |
Blue Thread-locker will help prevent the reflectors from unscrewing.
|
 |
Hose clamps ready for final trimming. After cutting them off I used a drill with a stone to polish the ends, then tucked them underneath out of the way.
|
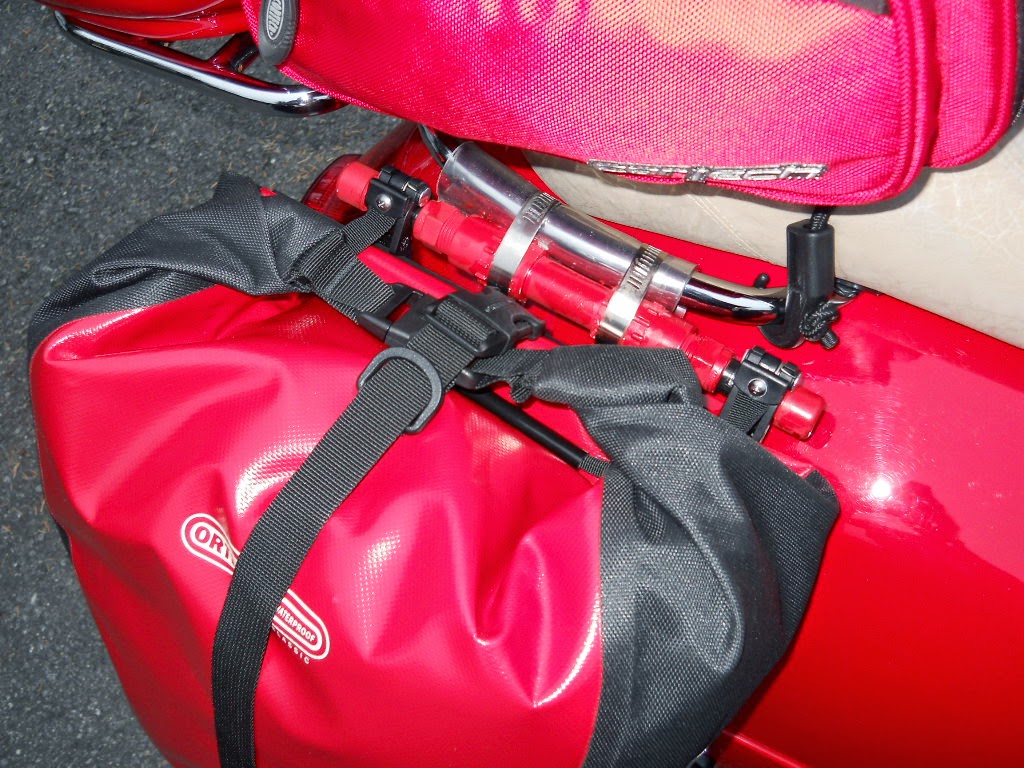
All soft panniers need to be secured on their leading edge to prevent them from flapping around at speed. For this I used a couple of items as found on line at Aerostich.com and the local True Value Hardware.
 |
| Note the attachment clip at the lower leading edge of the bag |
 |
| I found the black swivel clip that's mounted on the fender on line at Aerostich.com listed as "Bungee Loops". You get four of them in a pack, less than twenty bucks. The chrome pinch clips are available at most hardware stores, I found mine at True Value for under five bucks. |
 |
| Clean design, easy to use. I like! |
In summation this is a good system for scooters and I'd recommend them for anyone who likes to tour. The Ortlieb Back-Roller Classic panniers hold way more stuff than I needed for ordinary "motel" camping and they really are waterproof. Riding two-up might mean adding extra storage on the front rack but that's another story.
 |
| All finished. I be stylin'!! |
It's getting a bit late in the riding season for anything long distance but maybe I'll try to sneak in another short trip before winter arrives. Anyway adios for now, keep riding.


Nice work! :-)
ReplyDelete